Note: We support Magento Versions 1.6 through Version 1.9
Are you a Zoey eCommerce customer?
The setup process is similar to Magento so please Read Our Full Install Article
- If you are currently using an old version of the Magento extension, you will first need to uninstall that version before you can proceed with the new Magento Connect installation process. Please see this article.
Step 1: Install the Magento Extension
- Download the new extension from here https://drive.google.com/open?id=0BxZUrf0jNpbiT3ZWLVZrbjg1MGc
- Please follow the instructions from this link to install the extension. https://drive.google.com/file/d/0B--pDXHxagqaN01OOUhYRHFtX00
*****Note: If you are using the one step checkout for Magento, you will need to add this additional script to your file in order for Revenue Conduit to receive abandoned cart checkout webhooks. If you are not using one step checkout and you are using the default multi-step checkout, please skip to Step 2:
----------------------------------------------------------------------------------------------------------------------------------
Please copy paste following code snippet at the bottom of your head.pthml template app/design/frontend/(your_current_theme)/default/template/page/html/head.phtml
<script type="text/javascript">
var base_url_for_revenueconduit = '<?php echo Mage::getBaseUrl(); ?>';
</script>
<script type="text/javascript" src="s3.amazonaws.com/rc-prod-cdn/js/rc-util-magento.js"></script>
----------------------------------------------------------------------------------------------------------------------------------
The url s3.amazonaws.com/rc-prod-cdn/js/rc-util-magento.js is showing above without https. You will need to add the above script with https in that url.
---------------------------------------------------------------------------------------------------------------
Step 2: Create a Role
a). From Magento admin select System
b). Select Web Services
c). Select SOAP/XML-RPC-Roles
d). Click on ‘Add New Role’
e). Name the role as ‘RC_Role’
f). Click ‘Save Role’
g). Select ‘Role Resources’ from the left column
h). Select ‘Custom’ from the drop down for ‘Resource Access’.
i). Only select the Accesses shown in the below images
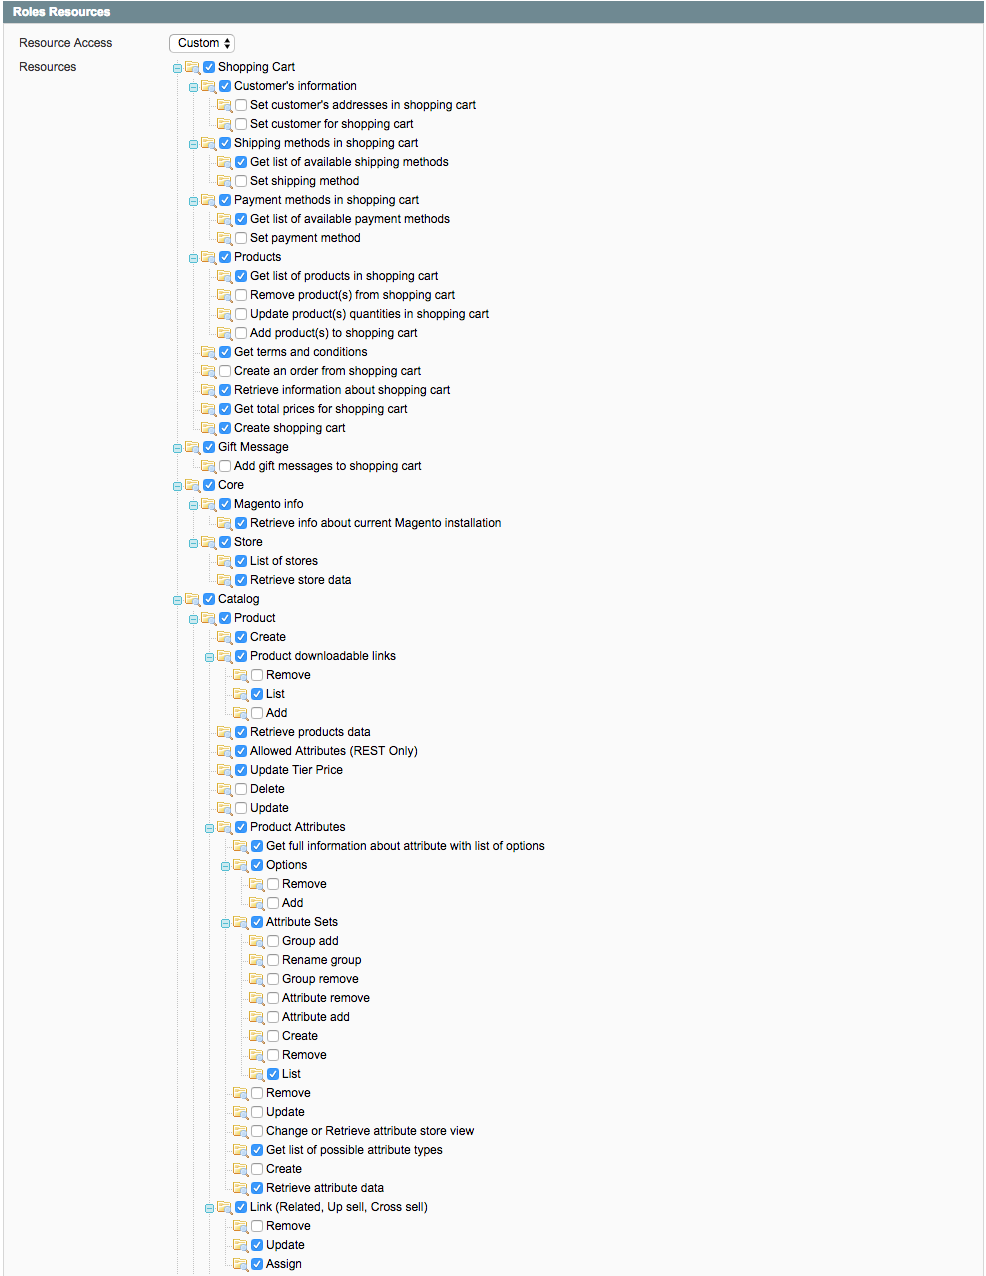
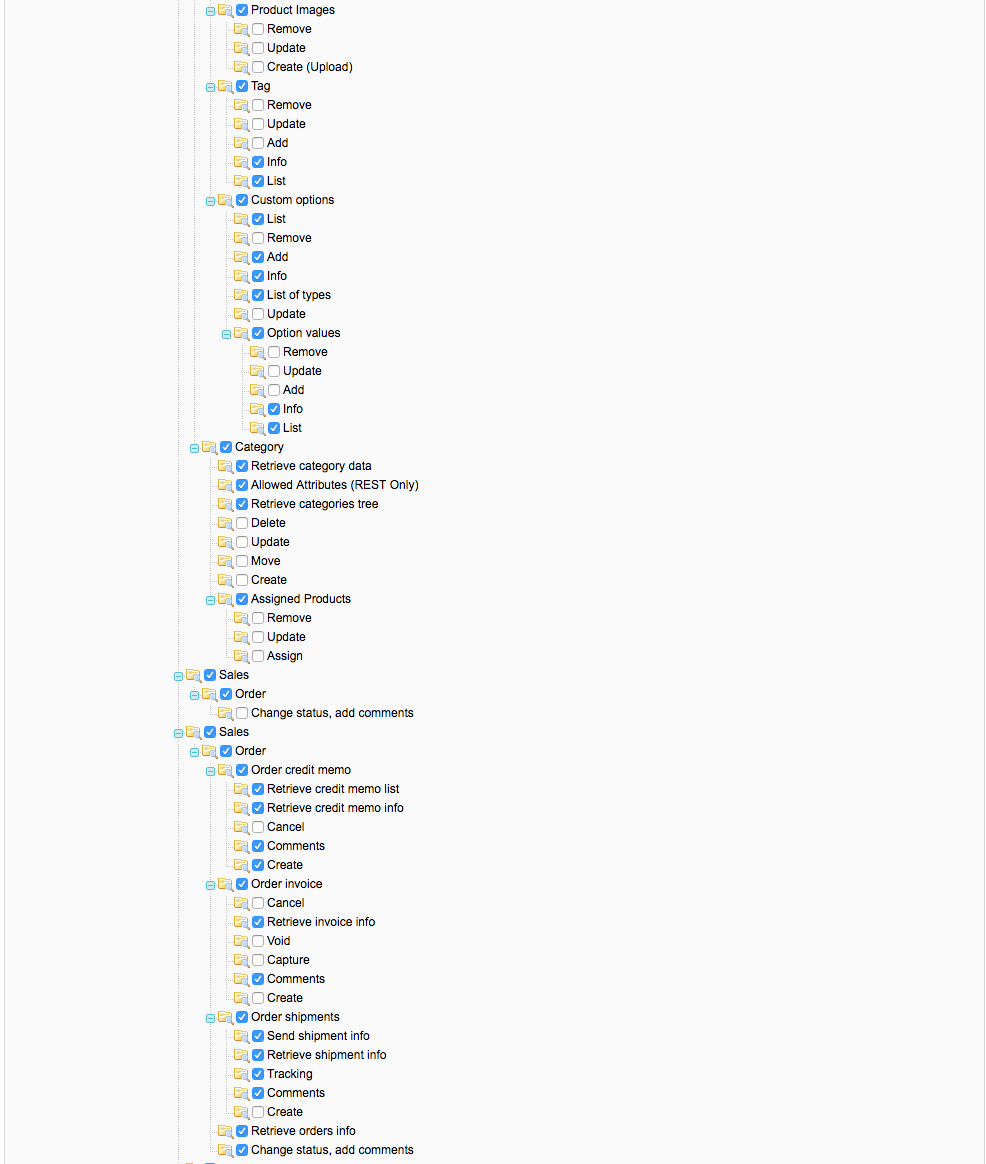
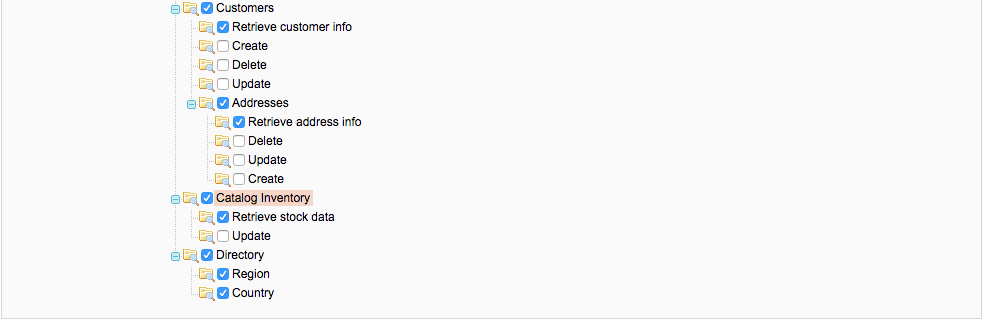
****FYI-
It is not mandatory to provide all the resources access. RC does only below request to resources using SOAP API so please give resource accesses accordingly.
- Read Shopping cart details
- Read Order data
- Read Customer data. Also customer subscribed detail.
- Read Product data
- Read Category data (also read product-category relations details)
- Create Coupon in Store
j). Click on save role
Step 3: Create an API User
a). From Magento admin select System
b). Select Web Services
c). Select SOAP/XML-RPC-Users
d). Add New User (fill out all fields and we recommend using strongpasswordgenerator.com to create the api key)
e). Set the account to Active
f). Save User
g). Select User Role as ‘RC_Role’ which was created in the above step 2.A
h). Click on Save User
Step 4:
Log into Revenue Conduit admin portal and enter in your API URL
(Ex: http://*YOURSITE.COM*/index.php/api/v2_soap/?wsdl)
Step 5:
Copy & Paste your API User and Role into the Store Details
Step 6:
Click Submit
Step 7:
Input Revenue Conduit Details Into Your Magento Settings
a. Under the System tab in Magento Admin select Configuration (Note that Revenue Conduit pops up on the left side of Magento)
b. Click on Revenue Conduit
c. Enter the Revenue Conduit application name (this is located in the top right hand corner of the RC admin panel).
d. Enter the Revenue Conduit store name (this is located under the Connect Shop section of the Revenue Conduit admin portal).
e. Select the dropdown to enable Abandoned Cart as Yes (if you plan to use our Abandoned Cart Recovery)
f. Save Configuration
NOTE: Revenue Conduit's interface has changed slightly from the video below. The Application Name is now located in the top-right corner of the interface to the left of the profile icon, rather than by clicking on the profile icon.