Before we get started, let's make sure you are on the correct guide.
If your store is on Magento 2 or above, then you are on the correct page. Read on!
Table of contents for setting up Magento 2
- Install the Magento 2 Extension
- Set API 'Resource Access' to 'Custom Resources'
- Whitelist Unific IP Addresses
- Authenticate Magento 2 with Unific OAUTH
- Confirm that the integration works
- What to do if you have multiple environments.
- Enable Admin Logging for Troubleshooting
- Troubleshooting
- How to send more webhooks and speed up the sync process?
Let's get started!
_________________________________________________________________________________________
1. Install the Magento 2 Extension
There are two options to install the extension. You only need to follow ONE of these options:
Option A: Install using Composer
Option B: Install manually with source code (Only for very advanced users)
Option A: Install using Composer
Do this option only if you are a developer, or send it to your developers:
- SSH to your sever:
$ ssh <user>@<ip-addresss-of-server>
- Go to the public_html directory of the store.
- Open composer.json and add below section under repositories:
- Visit https://magento2connector.unific.com
- As the above link says, copy & paste the JSON snippet in composer.json
"repositories": [{

    "type": "composer",

    "url": "https://magento2connector.unific.com"

}], - Save the composer.json file.
- Next, we need to update composer so that the new changes are picked up by Magento.
Run this command:
$ composer update
- Then we need to tell Composer which version to require. The command below will require any version greater than 1.4 of the Unific Connector:
$ composer require "unific/connector:^1.4.0"
- Now we need to run these two commands to upgrade Magento database schema, and also to clear the cache
$ bin/magento setup:upgrade

$ bin/magento cache:clean - Finally, we need to install cron support for Magento 2. This is required because the Unific Connector sends webhooks in an asynchronous fashion to control the load on Magento 2 installation. The following command will install cron for the www-data user.
$ sudo -u www-data bin/magento cron:install
Option B: Install manually using the source code
Sometimes store administrators are not allowed to install extensions from Composer OR the Magento Marketplace. In that case we also offer the option to install from the source code. This is not recommended for the novice user!
- Navigate to: https://magento2connector.unific.com/
- On that page, in the "Releases" section, Right click on the link with the largest release number and click "Open link in new tab".
- That will trigger a download. Save that to a location on your computer that you can find. Note: the file name will start with "unific-connector" and end with ".zip"
- Upload this file to the server where Magento 2 store is hosted
- Then navigate to the root folder of your Magento 2 store installation
- Change the "/path/to/connector.zip" portion of the command below to where the zip file was uploaded on that server. The zip file name may change as per the new changes so use the name that was downloaded on your machine, below is just an example.
Then run the command:
$ mkdir -p app/code/Unific/Connector && unzip unific-connector-f7b2c63b323a2b612fb4323572a91d049da7ad36-zip-6be6ab.zip
$ cp -fR unificdotcom-magento2-extension-f7b2c63b323a2b612fb4323572a91d049da7ad36/* app/code/Unific/Connector/ - Now we need to run these two commands to upgrade Magento database schema, and also to clear the cache
$ bin/magento setup:upgrade

$ bin/magento cache:clean - Finally, we need to install cron support for Magento 2. This is required because the Unific Connector sends webhooks in an asynchronous fashion to control the load on Magento 2 installation. The following command will install cron for the www-data user.
$ sudo -u www-data bin/magento cron:install
If you are having trouble with installation, please contact us at support@unific.com.
2. Set API 'Resource Access' to 'Custom Resources' and select resources mentioned below
Log in to the Magento Admin:
a. Click on "System" in the main menu
b. Click "Integrations" on the "System" menu
c. Click the pencil icon next to the "Unific-Integration" row
d. Click API
e. Set API 'Resource Access' to 'Custom' and select the 6 Custom Resources as shown in the below image (Note: The Unific Reports and Unific Historical resources are available for Unific Connector Versions higher than 1.4.15):.png?width=658&name=image%20(45).png)
3. Whitelist Unific IP Addresses
If your store has a firewall that may block Unific from connecting to the extension please contact support@unific.com and we will send you the necessary ip addresses.
All done with the Unific Connector extension installation? Great!
Oauth Settings in Magento
Next step is to allow Unific to use the Bearer Tokens:
- Go to STORES -> Configuration -> SERVICES -> OAuth.
- In Consumer Settings section set "Allow OAuth Access Tokens to be used as standalone Bearer tokens" to Yes.

- Save config
Create a Unific account
If you already have a Unific account:
- Log in to your Unific account
- Go to "Connected Apps"
- Click "Add Account"
- Choose Magento 2.x.
- Skip to step 5 in this section of this guide
The next step is to sign up for a Unific account.
- Go to https://app.unific.com/
- Enter the credentials you want
- Fill in the Company Information step
- Next, select Magento 2 as your shopping cart
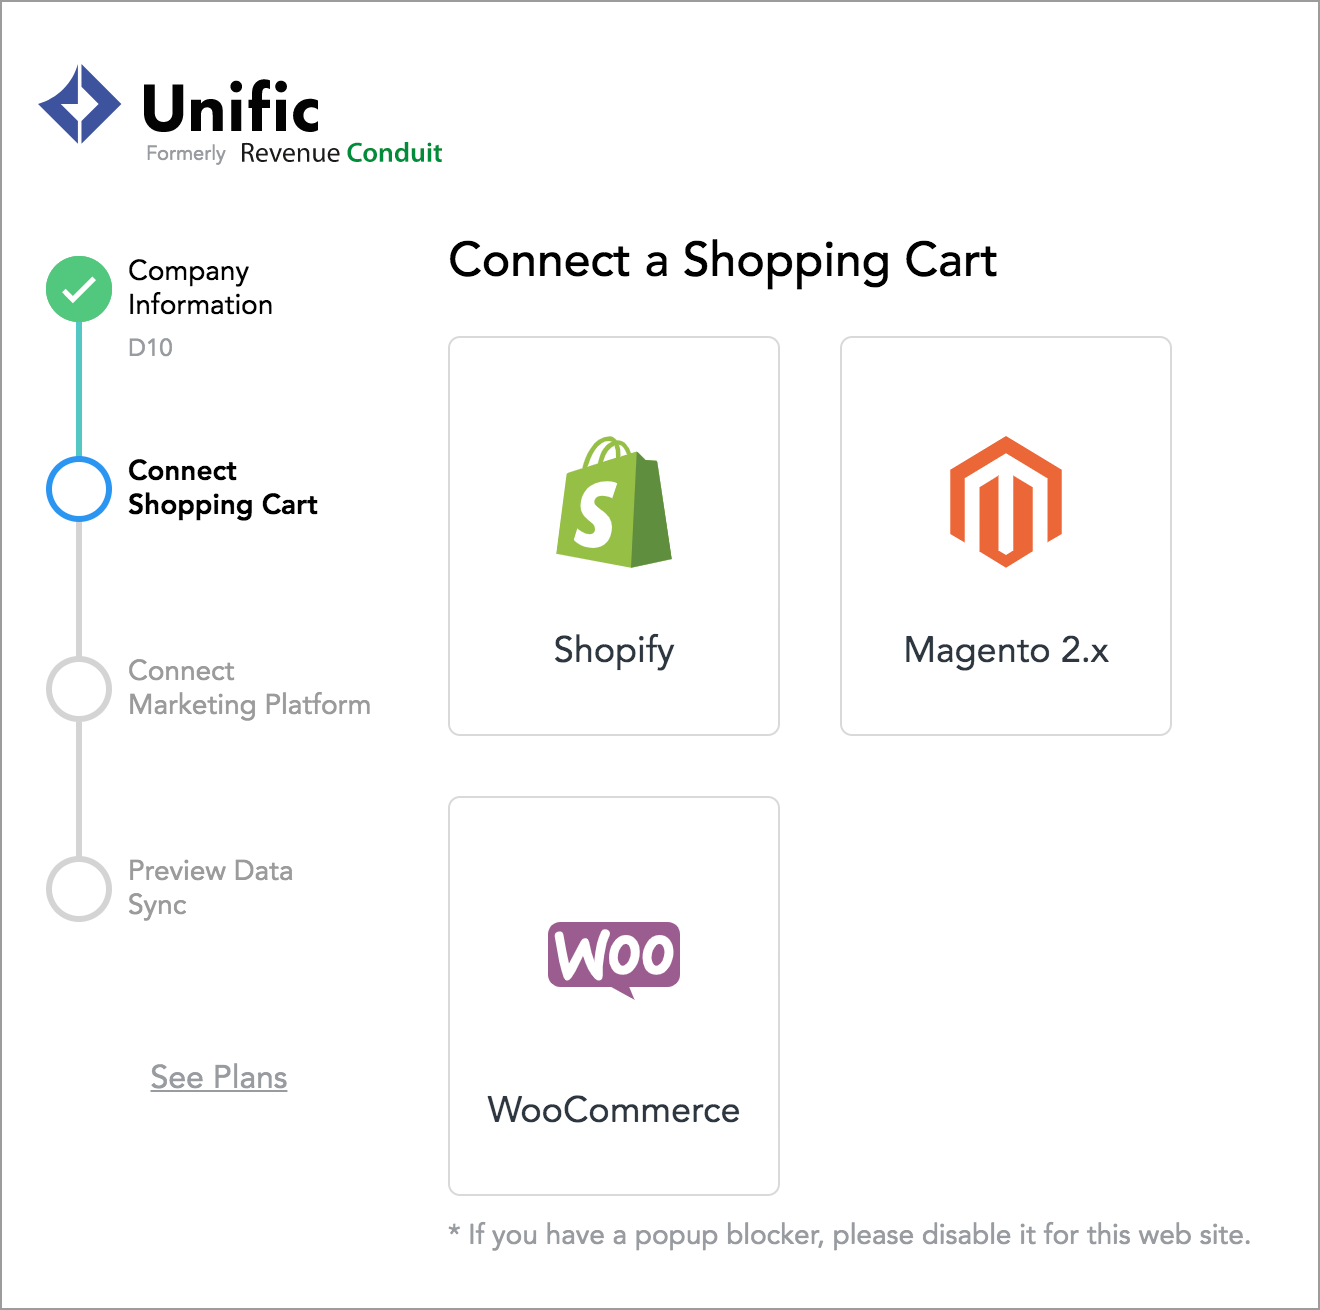
5. A pop up will appear. If it doesn't appear you might have a popup blocker. Please disable it for app.unific.com.
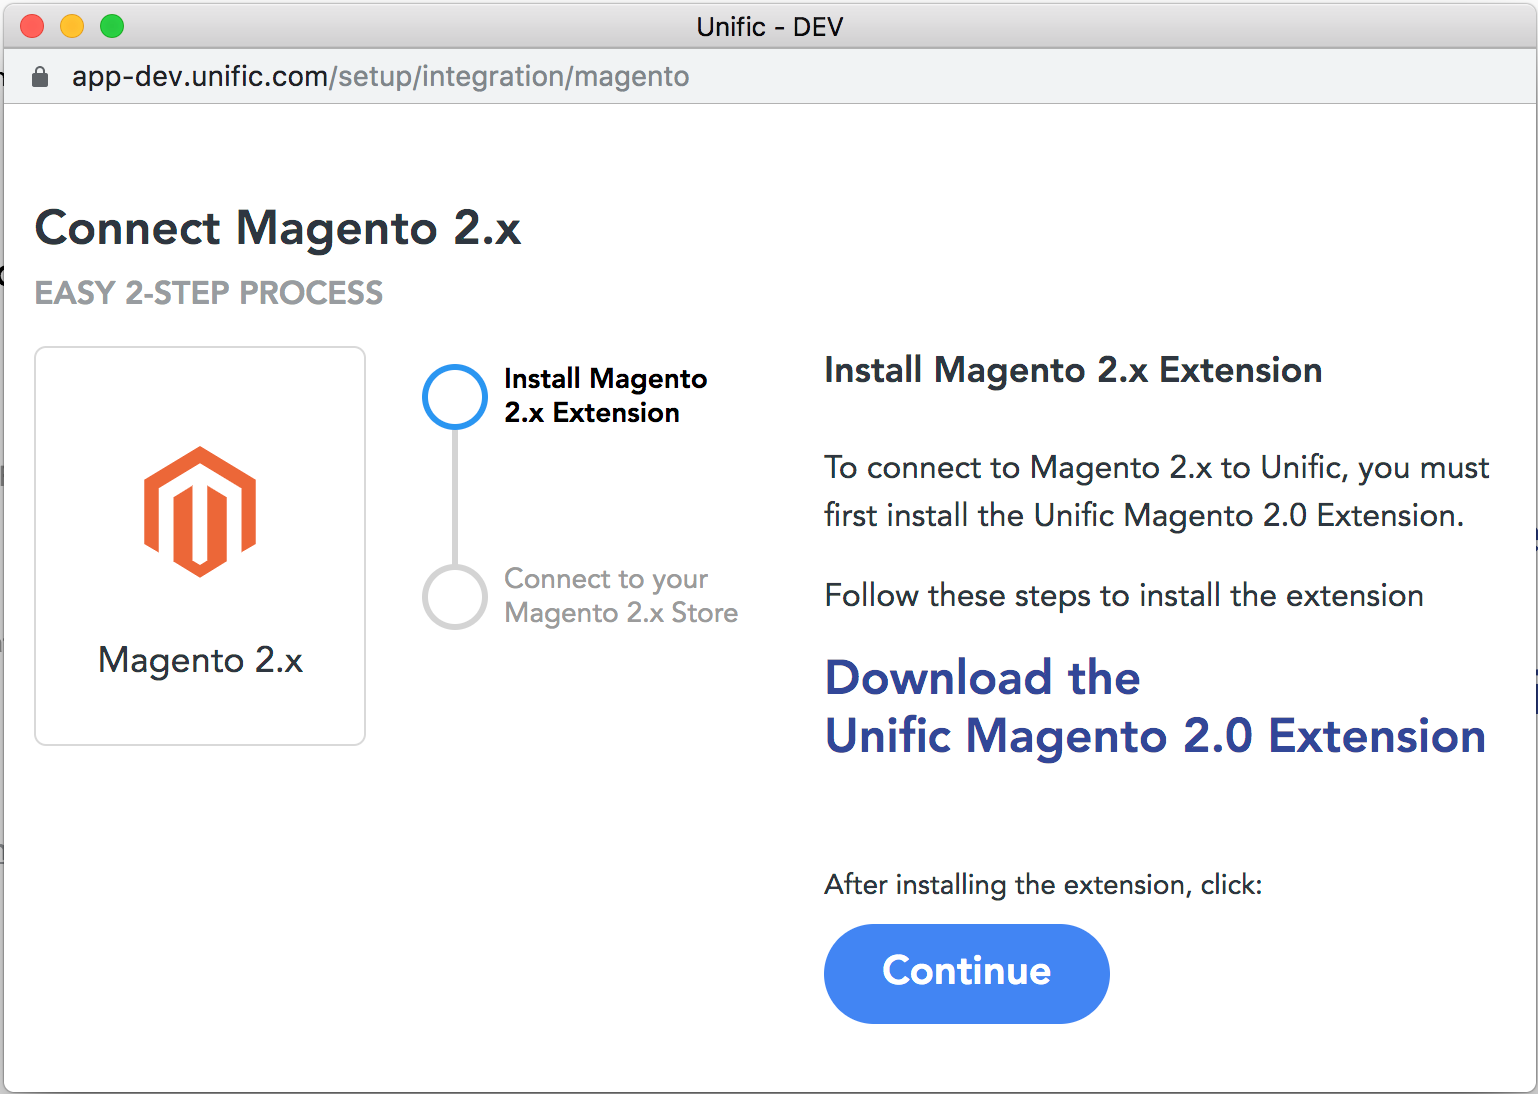
6. You should already have the Unific extension installed if you are following this guide. If you don't, scroll to the top of this page to see the instructions.
7. Click "Continue" if you already have the Unific extension installed.
8. Next, you will see this page where you need to enter certain details.
9. We will have to look inside of Magento 2 admin to find the details this page asks for.
(if you are installing Unific on a non-production environment for testing, see the "What to do if you have multiple environments" section below.)
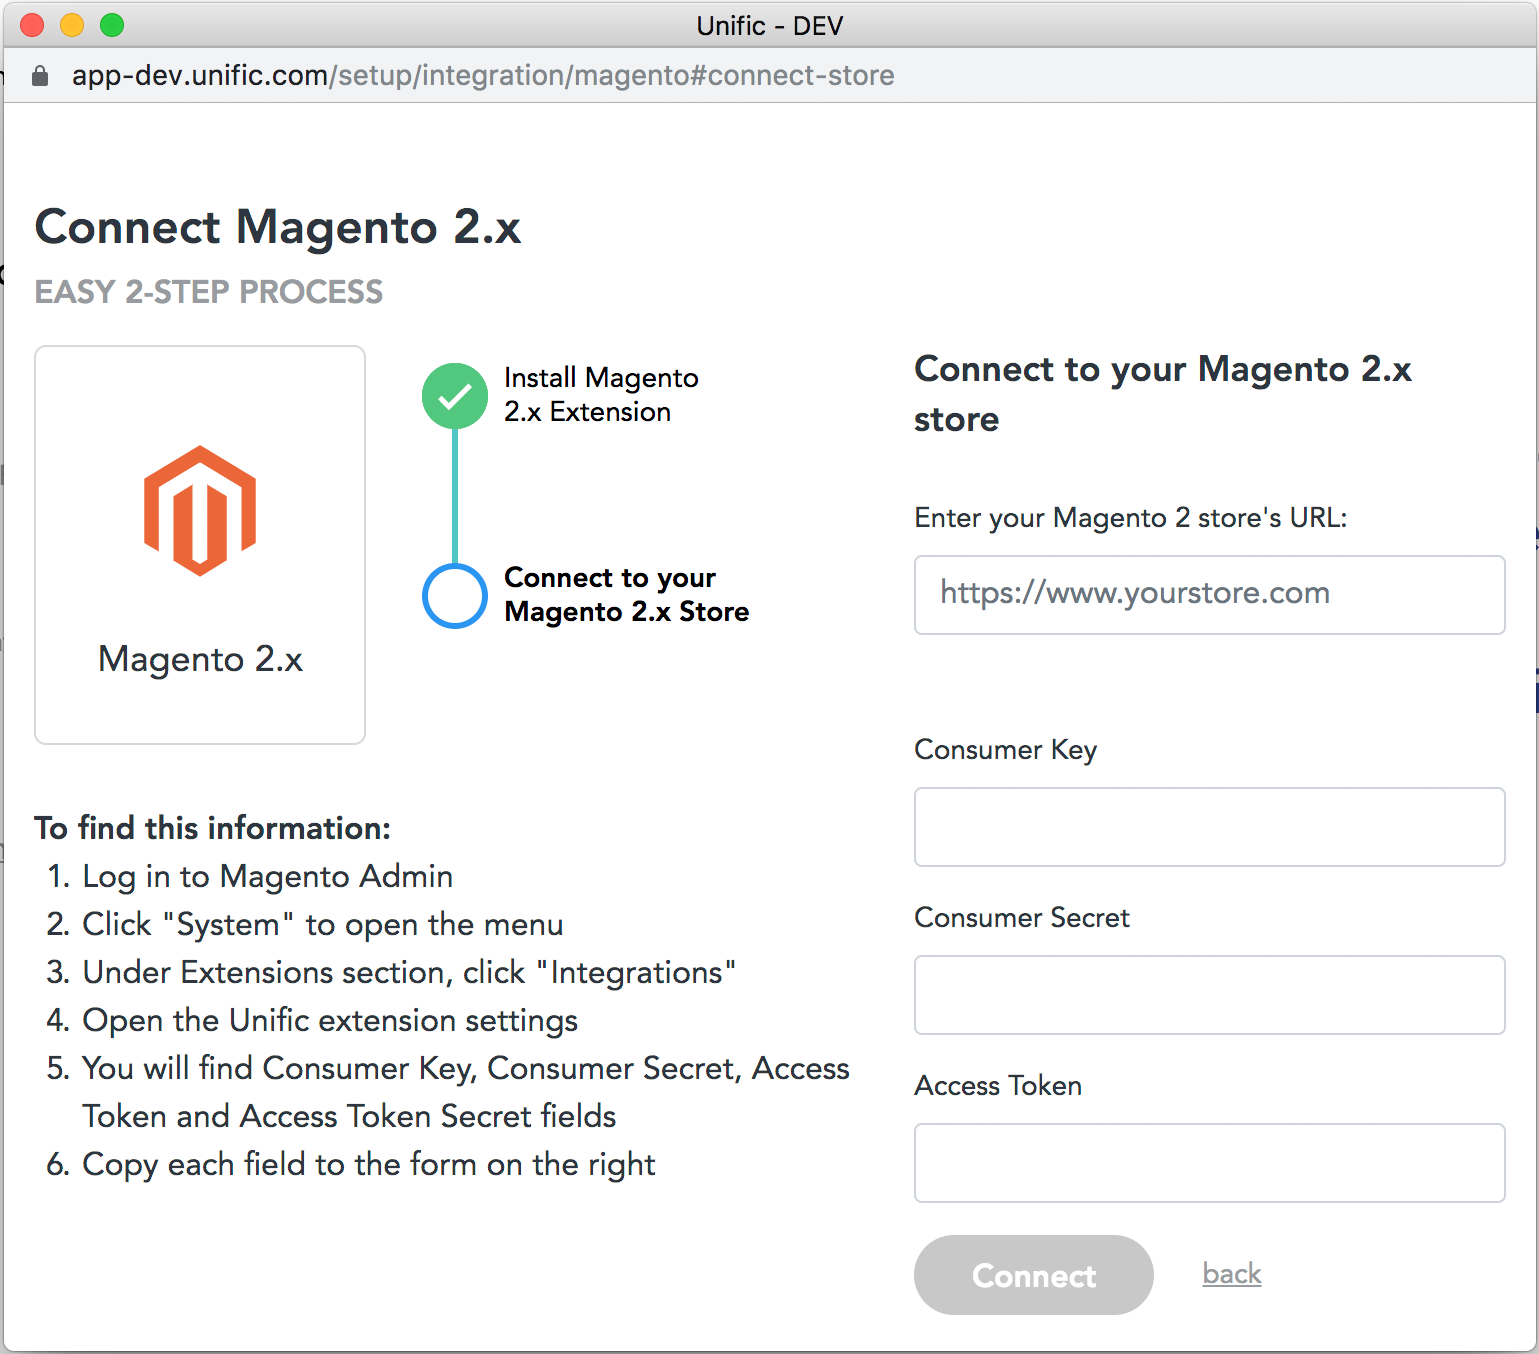
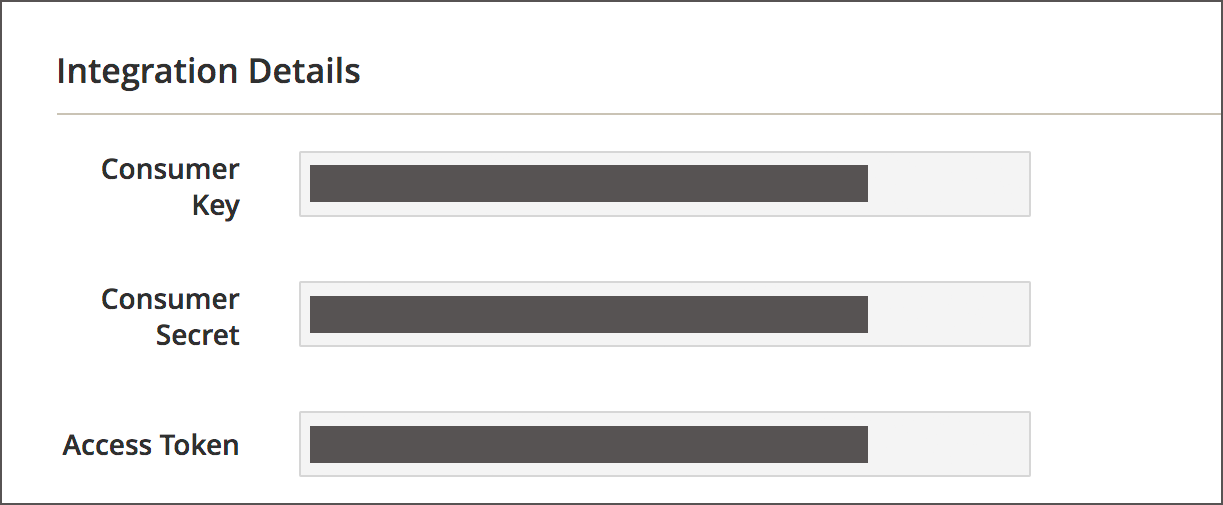
8. Where to find these details:
Magento 2 store's URL: This is the production URL of your Magento 2 instance. Use the URL you send to your customers.
Consumer Key: located in Magento 2 admin
Consumer Secret: located in Magento 2 admin
Access Token: located in Magento 2 admin
Here's how to find the three fields above:
a. Log in to the Magento Admin
b. Click on "System" in the main menu
c. Click "Integrations" on the "System" menu
d. Click the pencil icon next to the "Unific-Integration" row
e. Here you'll find the details you are looking for at the bottom inside of Magento 2
9. Enter the details from Magento and click "Connect".
10. If everything worked well, you should see a "Success" message.
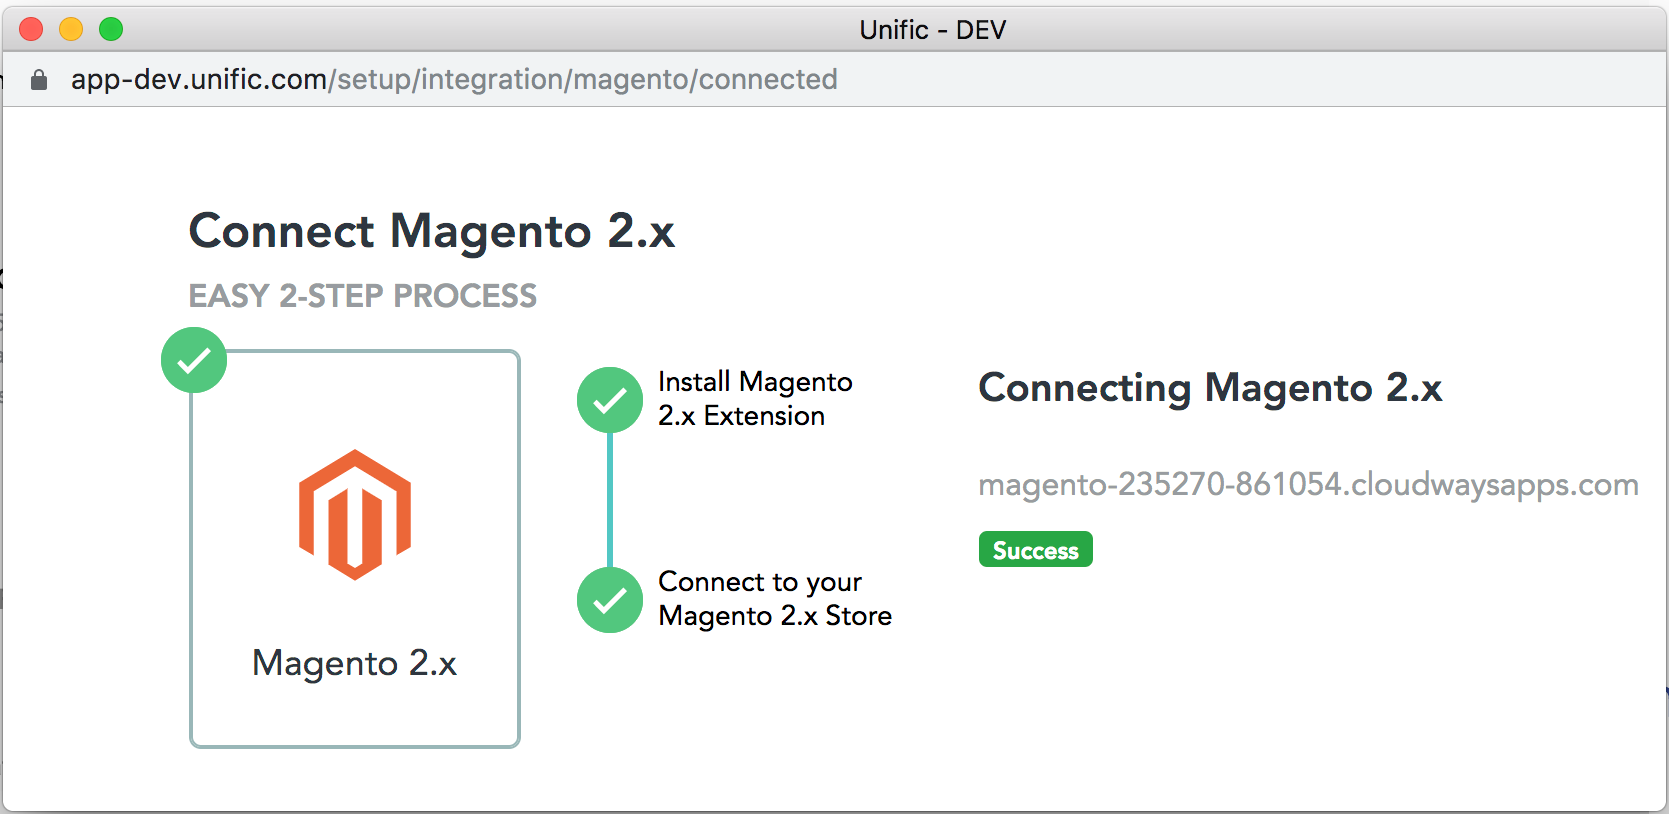
Note: If you have multiple environments, you will need to repeat this process for ALL environments.
11. Continue with the Unific signup process to connect HubSpot (follow the prompts).
5. Confirm that the integration works
The easiest way to confirm that there is a valid connection between Magento 2 and HubSpot is to open up your online store and register a new account.
Unific's extension will send a webhook to Unific and Unific will sync it to HubSpot in a few minutes.
If this is not working, then it may be that Unific is not getting webhooks from Magento 2.
Check that the crons are enabled on the server the store is set up on and also make sure the memory limit set on the server is sufficient to process the webhooks for sending it to Unific.
Please contact support@unific.com for additional help.
6. What to do if you have multiple environments
It is often the case that there are multiple environments like Dev, QA, Staging, and Production for Magento 2 stores.
Create a test Unific and a test HubSpot account for testing non-production environments
If you would like to test Unific on environments other than production we highly recommend the following:
- Create a FREE Hubspot account just for testing
- Create a FREE "test" account for Unific.
- Then connect your Dev, Test, QA or Staging Magento 2 store to that FREE test Unific account you just created in step 2
- Connect that free HubSpot account to the same Unific account created in step 2
- Perform the testing.
- After testing, create a fresh Unific production account and connect your production store to that account and production HubSpot account.
If you do have multiple environments, you must install the extension on all environments that you want to test and go through the "Authenticate Magento 2 with Unific OAUTH " process above.
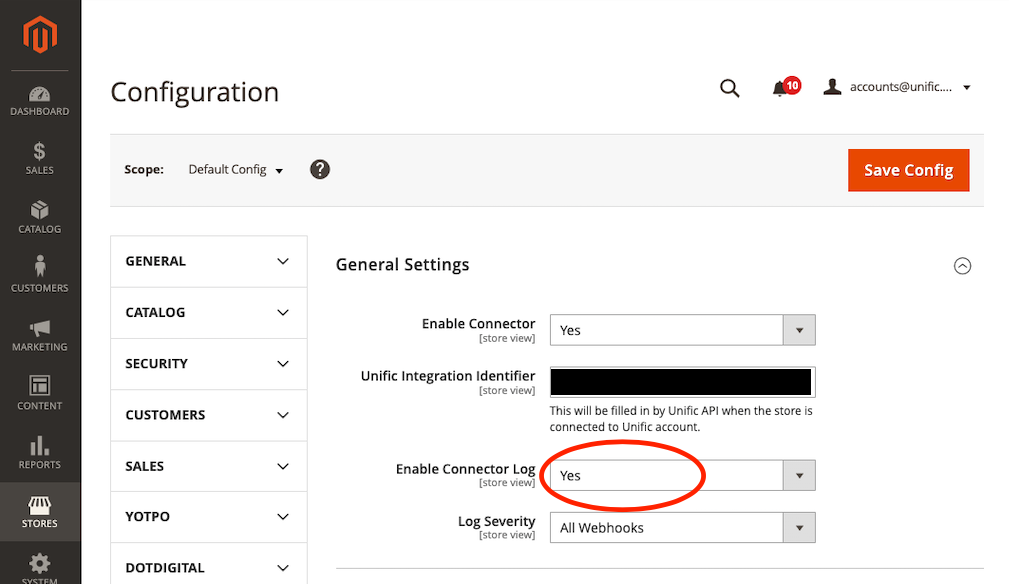
7. Enable Admin Logging for Troubleshooting
To enable admin logging:
- Go to the Unific extension configuration
- Change "Enable Connector Log" drop-down to "Yes".
8. Troubleshooting:
1. Connection Errors:
Error while retrieving integration metadata. Error message: ’java.lang.IllegalStateException: HMAC signing parameters are not present. Integration Id: ‘com.unific.models.integrations.Integration$Id@66fe2c83[organizationId=<organization-id>,integrationId=<integration-id>]‘’.
If you get the above error while connecting your store to Unific, there are a few issues that lead to this error:
-
Check that the access to resources is set to "Custom Resources".
-
Refer to the section "Set API 'Resource Access' to 'Custom Resources' and select resources mentioned below" above for details.
-
- If you have a firewall on your store email support@unific.com requesting a list of IP addresses to whitelist.
-
Check that the access token entered is correctly entered (check for whitespaces).
- If it is a development store and the server is restricted by Basic Authentication, you will need to remove the restriction so that Unific can make requests to the store server successfully. You can whitelist only specific IP addresses as mentioned in the section - Whitelist Unific IP Addresses.

-
Once these things are done please reconnect your Magento 2 store within Unific
Error while retrieving integration metadata. Error message: `com.unific.magento.models.MagentoException: Unauthorized`
If you get the above error while connecting your store to Unific, please follow below steps,
- Login to Magento 2 store admin.
- Go to STORES -> Configuration -> SERVICES -> OAuth.
- In Consumer Settings section set "Allow OAuth Access Tokens to be used as standalone Bearer tokens" to Yes.
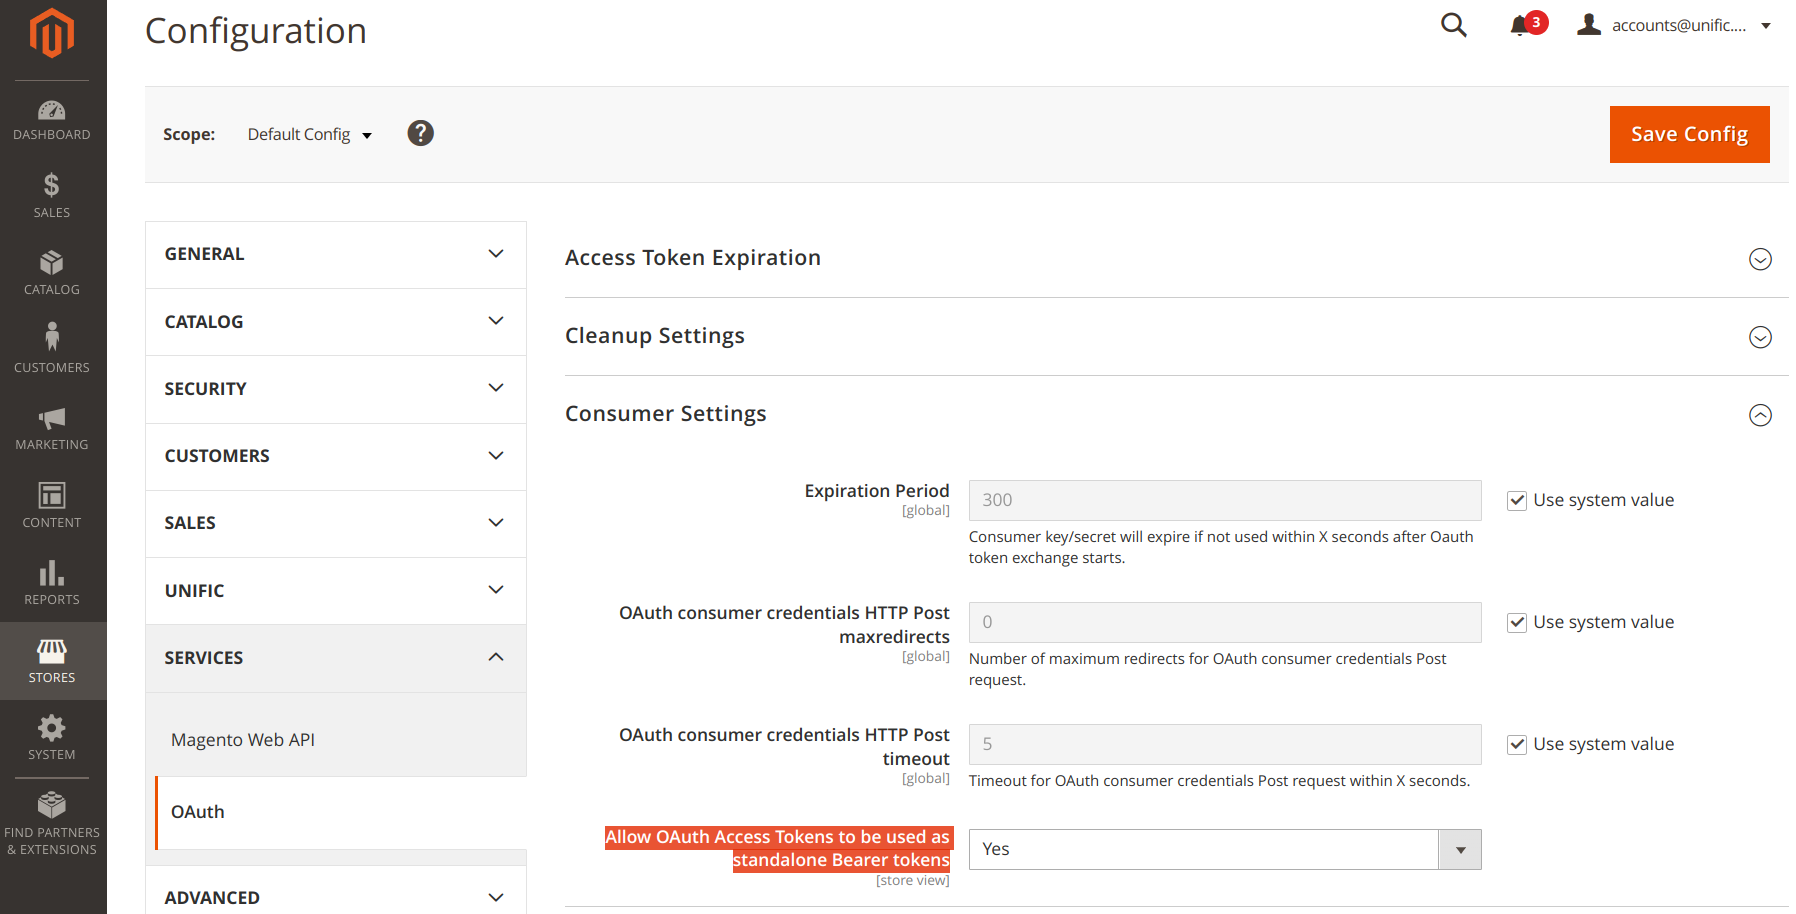
- Save config
2. Unific's Logging in Magento 2 Admin
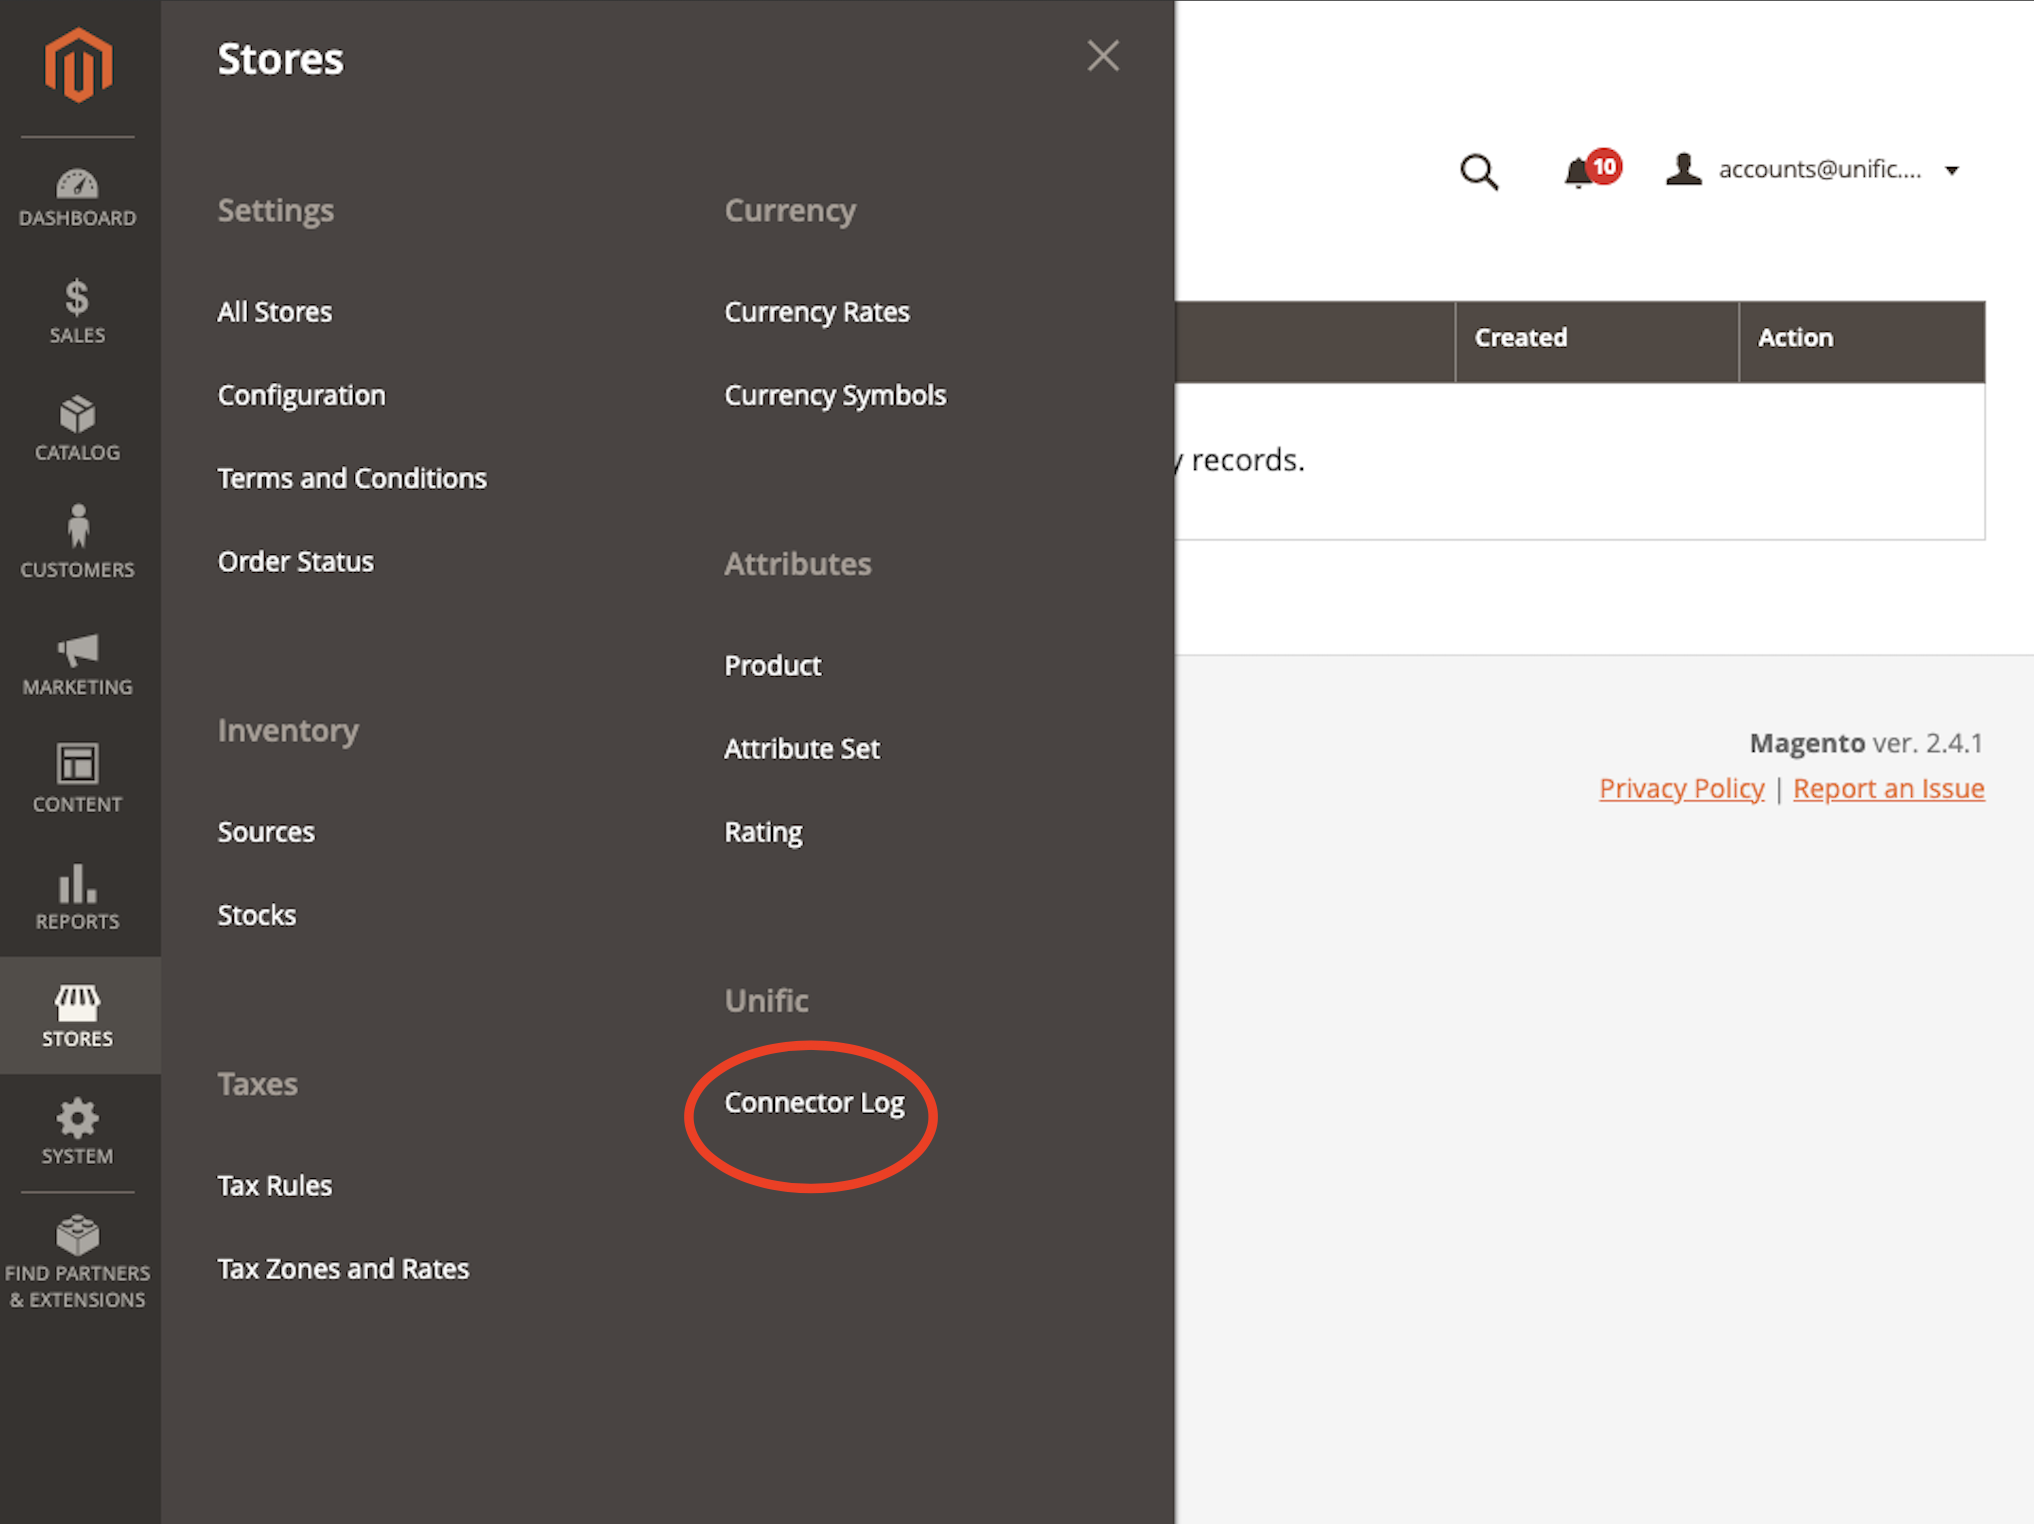
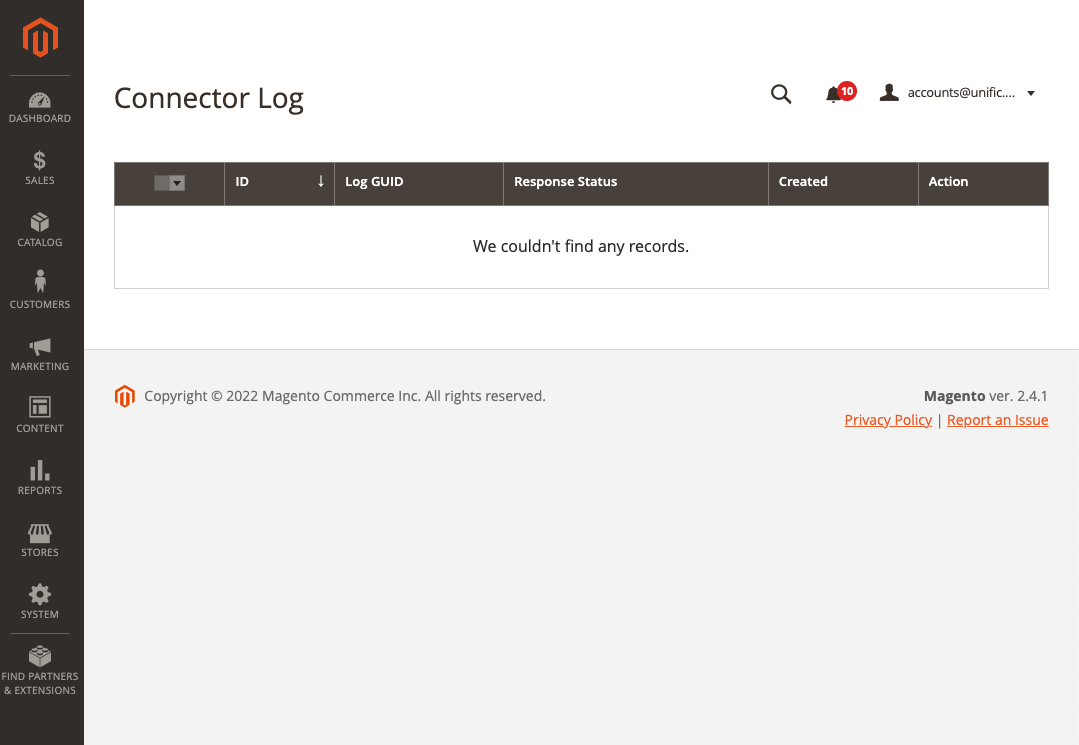
Unific has a log in the Magento 2 Admin. To access it:
- Log in to Magento 2 admin
- Click on "Stores" in the left menu
- Click "Connector Log" to access the connector log
The log might be empty if the logging has not been enabled in Unific admin. Follow the steps to enable Unific admin logging.
3. Unific's Backend Logging
Unific's log files are put under the directory: <magento-root-directory>/public_html/var/logs/
Refer to these log files if the webhooks are not being sent from the extension to Unific.
connector.log - If there are issues during installation, they should be logged here
unific-audit.log - shows the webhooks that are queued up for sending to Unific
4. Add Unific Integration manually
If Unific-Integration deleted from the store then add manually using these steps -
a. Log in to the Magento Admin:
b. Click on "System" in the main menu.
c. Click "Integrations" on the "System" menu
d. Click to Add New Integration button and add Unific-Integration with below details.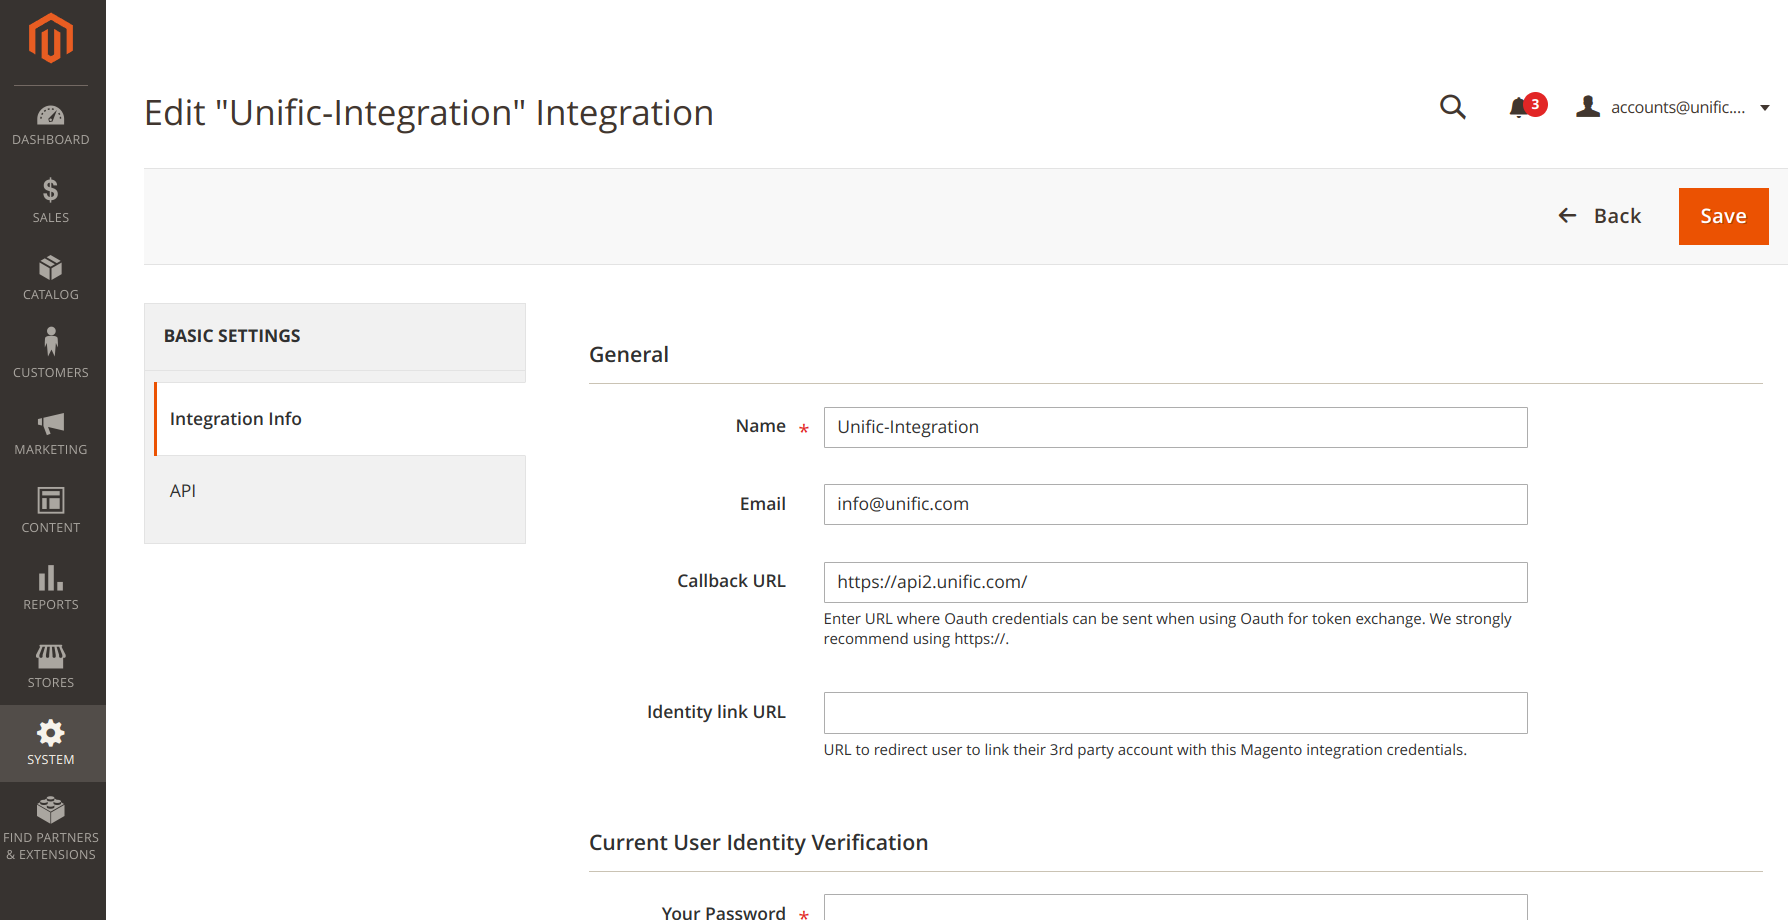
5. Troubleshoot webhooks in Magento 2
6. Wrong HMAC causing webhooks to fail authorization
Sometimes the HMAC that has been generated on initial connect attempts is no longer valid after multiple connection attempts.
To find the HMAC, visit Store > Configuration > Unific
Under "Security Settings" look for "HMAC secret Key"
Copy this HMAC key and send it to your Unific support email thread.

7. Problems and Solutions
Problem A:
An error appears in magento.cron.log.
Solution:
In your MySQL command line, unlock the tables and empty the cron schedule table, with following commands:
-------
Problem B:
This error appears in setup.cron.log
Solution:
PHP-FPM
- Remove unific connector from composer.json
- Reinstall the Unific Connector extension
-------
Problem C:
Unific Connector extension is updated, but recent changes are not reflected in the Magento 2 Admin on the extension pages.
Solution:
Check the opcache.validate_timestamps setting in the PHP configuration of the server:
- If enabled, OPcache will check for updated scripts every opcache.revalidate_freq seconds. When this directive is disabled, you must reset OPcache manually via opcache_reset(), opcache_invalidate() or by restarting the Web server for changes to the filesystem to take effect.
- If this is set this to false, opcode cache needs to be manually flushed
- If the opcode caching setting for php-fpm is set to never expire it will always load old code which is cached until the cache is either manually flushed or php-fpm is restarted
-------
Problem D:
Extension changes are still not immediately reflected after the extension is updated.
Solution:
Restart PHP-FPM (if your site uses PHP-FPM)
This command might differ based on your operating system.
-------
Problem E:
There is an error while running composer update.
Solution:
Check if the allow_url_fopen is On or Off using this command on the server (as root user):
If it's 'Off' change allow_url_fopen setting in php.ini file that's being loaded to 'On'.
So it should look like this in php.ini:
-------
Problem F:
Site issues after running composer update:
This request-id is actually a log file which will have the actual error in it. That log file will be located in:
If you open that file, it might say:
Solution:
Run this command on the Magento 2 Server.
Reload the site and it should work again.
-------
Problem G:
If you are on an older version of the Unific Connector you may get the error below while running 'composer update':
In this case, you will need to update your composer.json contents to match what is shown in the "Install using Composer" section above.
After making that change, run these commands to remove the older version of the extension and install the newest version.
-------
Problem H:
Order deals are stopped syncing but checkout deals are syncing to HubSpot:
In this case, the `unific_Connector_message_queue` table might be growing larger than expected. This happens when bulk orders are updated in the store or when more orders than expected are created.
Solution:
First clear the records from the `unific_Connector_message_queue` database table.
Then identify if the cron jobs are running often enough to process the records from the `unific_Connector_message_queue` table.
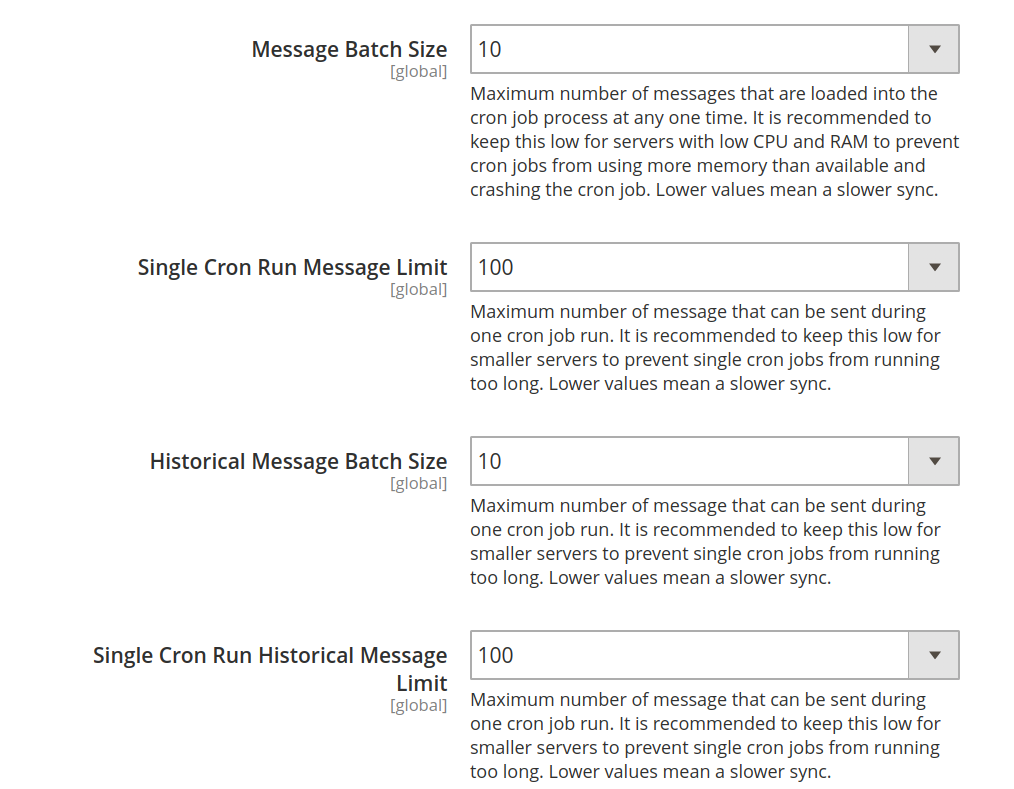
9. How to send more webhooks and speed up the sync process?
- From the store admin section, navigate to:
Stores -> Configuration -> Unific -> Connector Configuration -> Webhook Settings
After the endpoint settings, you would see the batch size and messages limit settings. - The Batch Size can be increased as per the server's memory capacity to load more messages at a time. The setting is separate for live messages and historical messages.
- The Single Cron Run Message Limit can be increased as per the server's capacity to process more messages in a single cron run. Again, this setting is separate for live messages and historical messages.
- The default settings look as in the below image.